Showing posts with label projects. Show all posts

Tuesday, March 2, 2010

Making Crystal Rock Candy

Today's Science project: making Rock Candy.

We borrowed the book, "Solids, Liquids and Gases" by Melvin Berger from the Station Library last weekend that contained instructions for making Rock Candy.

For Trent's reading today (he reads 20 minutes a day), he read all about how to make rock candy - almost the entire page you see here.

We took 2 cups of sugar and 1 cup of water and boiled until 242 degrees.  A watched pot never boils.

We tried the non-thermometer way of testing to see if our sugar was hot enough by putting a small amount into a bowl of cold water and it should have formed a ball......uh, ours didn't do that (?).  Then we set up our cups with strings and safety pins like the book said.  Although I read about using a stick/skewer instead and think I would have preferred that method. The book said our string needed to hang down to the bottom, but not touch the bottom.

Then we poured our sugar water into the glasses. 

And because we like to spice things up, we added a little color.

And here are our finished projects.  I'm not sure whey they're so cloudy.  We must have messed this up somehow.   Watching something grow in a class that reminds me too much of the avocado seed that never flourished - we tried twice!  How are we supposed to watch the crystals form?  I'm confused.  Did I screw up another attempt at doing a science project with my kids.  We'll just have to wait and see.

Selling on Etsy - listing an item

First, I logged onto Etsy using my user name and password.  Then I clicked "Sell" in the top menu bar.  Next, I clicked on "List your Items" in the main body of the web page.

Step 1: Item description and list material used to make item.
Step 2: Categorize and Tag your item - I chose 13!!!  These tags are what is used to pull your item in buyer searches.  If I search for "red infinity scarf" my scarf should show up because those 3 words were also 3 of my tags.
Step 3: Choose the price you want to sell your item for, & create a shipping profile (listing the cost for shipping and what countries you want to ship to)
Step 4: Upload the pictures you want to use
Step 5: Review and FINISH!!


Now I just wait for someone to come along and buy it, right?  Click here to see my scarf on Etsy!

Selling on Etsy - creating a seller account

Etsy is a well-known site for buying/selling handmade items. It's a bit like Ebay in the sense that different people can list their items on it, but it's done with set prices (no bidding) and all items are hand crafted. I've browsed the site a few times, mostly looking for craft ideas, and until now, that's been the extent of my relationship on Etsy.  My neighbor keeps telling me I should sell my infinity scarves on Etsy.  So.....here I go.  I'm going to share my experience with you. Follow me!

Creating an Etsy Seller Account: The process of registering a seller account is pretty user-friendly.  Before you start, you'll need a user name, an email address (only one Etsy account per email address) and your credit card to verify your identity.

1) go to Etsy.com
2) click on "Register" in the top right corner
3) when creating your account, you'll need to choose a user name. If you become a seller, this will also be your shop's web address. I chose katesprojects, so my seller web address should be http://katesprojects.etsy.com. You'll also provide a password and your email address and click "Submit"
4) confirm your account by logging into your email account and opening up the new email from Etsy. The email should contain a link, clicking on the line will complete your registration and open a new window.
5) To sell something, click on "SELL" in the top tool bar.
6) Click on "Get Started"
7) Enter your personal info (name and address), click "NEXT"
8) Enter credit card information for verification purposes. You will be charged $1.01 to verify. Paypal can still be used to pay seller fees.

Selling on Etsy: Listing at item costs 20 cents and Etsy charges 3.5% of the sale price.  All listings get up to five photos for free and the listings stay up for 4 months. 

Shop Set-Up: Found as a link on the left hand side.

For simple steps on listing your item, click here.

Sunday, February 21, 2010

Refinishing a chair

The perfectionist in me still isn't thrilled with how this turned out, but it was fun little project with decent end results.

Let me start off with a little background info.  Before moving to this current house (Yuma base housing), we had our nice wooden computer desk in our spare room.  This house came with a built-in computer desk that is in the landing at the top of the stairs and with a smaller spare room, we decided to put our computer there and store the desk for now.  While it's not a bad little computer nook, the location is awful and I can't think of another way to use that built-in desk and not have it look out of place.  It's the first thing you seen when you walk up the stairs.  Until now, I've had a blue fabric-upholstered office chair at the desk - while comfortable and functional, it's not exactly what I want to look at the back of every time I go up the stairs.  For a while, I've been thinking of how nice it would be to get a nicer chair to put at the computer desk.

While at Goodwill on Friday, I found this cute chair that looked like it had a lot of potential.  I redid the upholstery on my dining room chairs and I've stained furniture before, so it seemed like an easy enough fix.  I paid less than $5 for it!!


After I've taken the seat off...

So, I got out my mouse sander and went to town.  It was hard to get the stain off and I finally decided I'd done enough.  I was hoping that when I re-stained it, it would all blend in....


Here's the chair after I stained it. See how well it blended?...okay, so it didn't blend - guess it has that rustic, weathered look?  I already had stain from a bench I did a year and a half ago, so I just used it.  It's a bit of a cherry color.
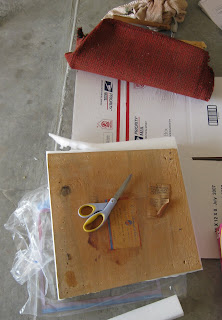
When I took the upholstery off, I discovered that the old padding was pretty sad, so I bought new padding from JoAnn Fabric that was less than $4 after my 40% off coupon.  
And this is me going to town with the staple gun.  I have my knees on the wooden bottom of the seat and am stapling the fabric.  Maybe I didn't do the padding quite right or the fabric wasn't thick enough, put it puckers a bit from the staples.....again, the perfectionist in me is a little disappointed.  I bought 3/4 of a yard of fabric from Wal-mart for $1.50.

And lastly, we have the finished product!

If I had to do this again, I think I would have just painted the chair (not stained it).  It would have looked really cute painted white and distressed with a light blue upholstered seat, but that wouldn't fit into my decor.  Am I in love?  No.  Am I thrilled down to my toes about how it turned out?  No.  Did I learn a few things from this?  Yes.  The total cost for this chair was about $10, so I can't complain too much.  And, it satisfied the green in me - it's recycled.

Friday, February 12, 2010

Where have I been?

My new website, YumaMom, has been my current obsession.  So far, I'm still really enjoying it, but it takes a lot of time to keep it current.  And I have learned SOOOO much about the world wide web, from RSS feeds to HTML code and that has taken up a lot of time too.  It's not just about posting things on the blog, but also about making it a usable product.

I've added a calendar to the site that links back to YumaMom posts with more information.  I also created a Fan Page on Facebook for YumaMom (called YumaMom.com) and with that, found a way for my blog posts to directly feed to the Facebook Fan Page - all very exciting!!  Look how many fans I have!!

YumaMom.com


I have advertisements through Google AdSense on the main site: www.yumamom.com and when someone clicks on one of the ads, I get paid.  While it's usually about $0.20 a click and there are several days that no one clicks at all, I've made about $80 in the 4 weeks the site has been up and running.  And I'm getting such positive responses from other moms, it's so encouraging.  While $80 a month does little to compensate me for the endless hours I put into this, I can only hope that the revenues will increase as the site's popularity increases.

Thursday, December 17, 2009

Shhh....it's a secret!

I'm very excited about my new blog and wanted to let you know that things will really start picking up after the holidays.  I'm aggressively working on a project that has been sucking up all my time to work on other projects and it's a gift - so I can't share just yet.  I'll be sharing photos and info with you once it's done.  So, think of me and my twitching left eye as I try desperatly to finish in time!